
I have been seeing couple of queries in few tech forums for uninstalling Remote Desktop Connection (RDP) 6.0, or how to revert to original version of XP SP2 RDP client (mstsc.exe version 5.1.2600.2180).
RDP 6.0 was released as a patch (KB925876), therefore, by default it doesn't appears as a seperate entry in Add/Remove list. To uninstall it, you'll have to click on the check box of "Show updates" in Add/Remove window, select "Update for Windows XP (KB925876)", and remove it.
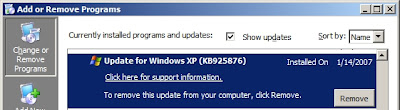
Alternatively, you can also browse to the folder C:\WINDOWS\$NtUninstallKB925876$\spuninst\ and run spuninst.exe from there, which will uninstall RDP 6.0 client and revert to the older version.
KEYWORD "UNINSTALL"
CLICK ME FOR READ MORE >>>


