Thursday, 24 March 2011

How To Uninstall RDP 6.0

I have been seeing couple of queries in few tech forums for uninstalling Remote Desktop Connection (RDP) 6.0, or how to revert to original version of XP SP2 RDP client (mstsc.exe version 5.1.2600.2180).
RDP 6.0 was released as a patch (KB925876), therefore, by default it doesn't appears as a seperate entry in Add/Remove list. To uninstall it, you'll have to click on the check box of "Show updates" in Add/Remove window, select "Update for Windows XP (KB925876)", and remove it.
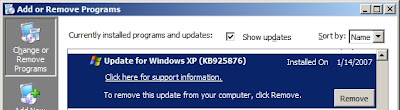
Alternatively, you can also browse to the folder C:\WINDOWS\$NtUninstallKB925876$\spuninst\ and run spuninst.exe from there, which will uninstall RDP 6.0 client and revert to the older version.

KEYWORD "UNINSTALL"

CLICK ME FOR READ MORE >>>

How To Disable Credentials Prompt of RDP 6.0

Remote Desktop Connection client 6.0 introduces new authentication features to improve security for Windows Vista and Windows Longhorn Server, which makes it mandatory for the user to enter logon credentials before RDP client can establish connection to the remote server (" Enter your credentials for <server>. These credentials will be used when you connect to the remote computer" ). But if the remote machine is configured to show logon warning message or if the remote system happens to be Windows 2000 or XP, you’ll need to enter the credentials again at remote machine’s logon screen.
T

CLICK ME FOR READ MORE >>>

remote access service (RAS)

RAS was a service provided by Windows NT which allows most of the services which would be available on a network to be accessed over a modem link. The service includes support for dialup and logon, and then presents the same network interface as the normal network drivers. It is not necessary to run Windows NT on the client - there are client versions for other Windows operating systems.
A feature built into Windows NT that enables users to log into an NT-based LAN using a modem, X.25 connection or WAN link. RAS works with several major network protocols, including TCP/IP, IPX, and NBF.
for example

when the user needs to connect to the lan at the office time to time from remote location the RAS has to configured at the office.the RAS has attached to the modem and a fixed phoneline.once the remote user dials to the phone number of RAS using his dialup connection the RAS accepts the call and validate user credential.if the user is authorised he is allowed to connect to the office lan.
callback
in remote access,the callback option is allow the RAS to called back to the remote user once the account validated.there are

CLICK ME FOR READ MORE >>>

what are digitally signed drivers

after the difficulty experience with the windows 2000 Microsoft has realized the importance of driver compatibility with windows.the hardware manufactured and then come up with there driver compatible with Microsoft operating systems.and they were tested at Microsoft labs.once a driver found compatible with Microsoft it was added with the CAB file as a digital signature.now when drivers installing into windows its looks for this CAB file.the drivers are proceeded if it founds digital signed,but otherwise there are 3 option of actions as below.
  • ignore
  • warn
  • block
KEYWORD "SYSTEM TIP, HOW TO MAINTAIN SYSTEM,SYSTEM SHORT CUTS,TIPS FROM BLOGSPOT,LATEST NEWS,OS INSTALL HINT,SNAPSHOT TUTORIAL,PROGRAMMING HINT,SOFTWARE INSTALL HINT,WEB DEVELOPMENT,WITHOUT INVESTMENT JOBS,ONLINE JOB IN COIMBATORE,

CLICK ME FOR READ MORE >>>

error codes and there meanings

This section lists the error codes and possible resolutions for the error codes. The error codes are listed in numeric order.

Before you continue, make sure that you have the error code available. You can view the error code in the device Properties dialog box available in Device Manager. You can also resolve many of the errors within Device Manager.

To start troubleshooting, follow these steps:

  1. Make sure that Device Manager is open, and that the device that has the problem is selected. You can perform some recommended resolutions through Device Manager.
    1. Right-click My Computer, and then click Properties.
    2. Select the Hardware tab, and then click Device Manager.
    3. Double-click the device type that has the problem. For example, if you have problems with your modem, double-click Modems to see the devices in that category.

      A list of devices appears. If a device has problems, the device has a red exclamation point next to it. If a device is unknown (usually because of missing drivers), the device has a yellow question mark next to it.
    4. Right-click the device that has the problem, and then click Properties. This opens the device Properties dialog box. You can see the error code in the Device status area of this dialog box.
  2. Use the Troubleshooting Wizard, if it is available, to help you diagnose and resolve your problem.
    1. On the device Properties dialog box, click the General tab.
    2. Click Troubleshoot to start the Troubleshooting Wizard. The wizard asks you some simple questions and provides a solution to your problem based on the answers that you provide. If the Troubleshooting Wizard is not available, go to step 3.
    3. Follow the resolution steps provided by the wizard to resolve the problem.
    4. Check the Device status area of the device Properties dialog box to see whether the error is resolved. If the error is resolved, you are finished. Otherwise, go to step 3.
  3. If the Troubleshooting Wizard did not help you resolve your problem or was not available, locate your error code in this article.

  4. Follow the recommended resolutions for that error code.
    • Check the Device status area of the device Properties dialog box to see whether the error is resolved. If the error is resolved, you are finished.
    • If the problem still occurs, unfortunately, this article did not resolve your problem. For your next steps, you may want to ask someone for help.

    Codes 1 through 10

    Review this section if you have received an error code between 1 through 10.

    Code 1
    This device is not configured correctly. (Code 1)
    Cause

    The device has no drivers installed on your computer, or the drivers are configured incorrectly.

    Recommended resolution

    Update the driver

    You may be prompted to provide the path of the driver. Windows may have the driver built-in, or may still have the driver files installed from the last time that you set up the device. If you are asked for the driver and you do not have it, you can try to download the latest driver from the hardware vendor’s Web site.

    In the device properties dialog box, click the Driver tab, and then click Update Driver to start the Hardware Update Wizard. Follow the instructions to update the driver. If updating the driver does not work, see your hardware documentation for more information.


CLICK ME FOR READ MORE >>>

how to create hardware profile

You must be logged on as an administrator or a member of the Administrators group in order to complete this procedure.

to create hardware profile

  • right click my computer
  • click properties
  • click hardware tab
  • click hardware profiles
  • Under Available hardware profiles, click Profile 1 (Current), and then click Copy
  • rename as you like (eg - power save)
  • click ok


CLICK ME FOR READ MORE >>>

ntfs / security permissions

these security only applicable in NTFS partitions only.it can assign to folder level permissions and file level permissions.it can applied in locally or over the network.

below steps is about how to activate permissions tab in windows xp

  • go to the folder option
  • click view tab
  • scroll to the bottom and find '' use simple file sharing ''
  • if it already selected uncheck '' simple file sharing ''
  • click apply and ok
now you can see the permission tab in the files and folders.from there you can assign permission as you want.

permissions (from lowest to highest)

  • read - open folder and its sub folders,open files inside them
  • list folder content - arrange the sub folders and files and traverse in that folder
  • read and execute - to execute executable files in that folder (eg - exe,bat)
  • write - edit files, create sub folder and files in that folder,paste files to folder copied or moved from another location.
  • modify - delete folder and its sub content.
  • full control - managing inheritance , take ownership , set permissions.
Note - when user gets permissions of '' write '' he also gets permissions of '' read '' - '' list folder content '' - '' read and execute ''

KEYWORD "ntfs,system info,security tips"

CLICK ME FOR READ MORE >>>

workgroups (peer-to-peer)

a windows xp professional workgroup is a logical grouping of networked computers that share resources, such as files and printers. a workgroup is also called a peer-to-peer network because all computers in the workgroup can share resources as equals (peers) without a dedicated server.

each computer in the workgroup maintains a local security database, which is a list of user accounts and resource security information for the computer on which it resides.therefor using a local security database decentralizes the administration of user accounts and resource security in a workgroup.


workgroups have decentralized administration and security, the following are true.

  • a user must have a user account on each computer to which he or she wants to gain access.
  • any changes to user accounts such as changing a users password or adding a new user account, must be made on each computer in the workgroup.if you forget to add new user account to one of the computers in your workgroup, the new user will not be able to log on to that computer and will unable to access resources on it.

a workgroup provides the following advantages
  • it does not require inclusion of a domain controller in the configuration to hold centralized security informations.
  • it is simple to design and implement. it does not require the extensive planning and administration that a domain require.
  • it is a convinient networking environment for a limited number of computers in close proximity. however a workgroup becomes impractical in environments with more than 10 computers.

KEYWORD "system info,pear,workshop"

CLICK ME FOR READ MORE >>>

domains

a domain is a logical grouping of network computers that share central directory database. a directory database contains user accounts and security informations for the domain.this database known as the directory and is the database portion of active directory service.

in a domain the directory resides on computers that are configured as domain controllers. a domain controller is a server that manages all security related aspects of user and domain interactions, centralizing security and administration.

the steps in the authentication process are as follows

  • the user logs on by providing logon information, such as username and password, and windows xp professional forwards this information to the security subsystem of that local computer.
  • windows xp professional compares the logon informations with the user informations in the local security database, which resides in the security subsystem of the local computer.
  • if the information matches and the user account is valid, windows xp professional creates access token for the user. an access token is the users identification for that local computer. it contains the users security settings, which allow the user to gain access to the appropriate resources on that computer and to perform specific system tasks.
if a user logs on to a domain, windows xp professional contacts an available domain controller in the domain. the domain controller compares the logon informations with the user information that is in the directory for the domain. if the information matches and the user account is valid, the domain controller creates an access token for the user. the user security settings contained in the access token allow the user to gain access to the appropriate resources in the domain.
KEYWORD "SYSTEM TIP, HOW TO MAINTAIN SYSTEM,SYSTEM SHORT CUTS,TIPS FROM BLOGSPOT,LATEST NEWS,OS INSTALL HINT,SNAPSHOT TUTORIAL,PROGRAMMING HINT,SOFTWARE INSTALL HINT,WEB DEVELOPMENT,WITHOUT INVESTMENT JOBS,ONLINE JOB IN COIMBATORE,

CLICK ME FOR READ MORE >>>

the windows security dialog box

the windows security dialog box provides informations such as the user account currently logged on and the domain or computer to which the is logged on. this information is important for users with multiple user accounts, such as a user who has a regular user account as well as a user account with administrative privileges.

you access the windows security dialog box by pressing ctrl+alt+delete if the computer is joined to a domain or the welcome screen is disabled, otherwise the task manager will be activated.

lock computer

allow users to secure the computer without logging off. all programs remain running. users should lock their computers when they leave for a short time. the user who locks the computer can unlock it by pressing ctrl+alt+delete and entering the valid password. an administrator can also unlock a locked computer. this process logs off the current user.

logoff

allows a user log off as the current user and close all running programs, but leaves windows xp professional running.

shutdown

allows a user to close all files, save all operating system data, and prepare the computer so that it can be safely truned off.

change password

allows a user to change his or her user account password. the user must know the current password to create new one. this is the only way users can change their own password.administrators can also change the password.

task manager

provides a list of the programs that are running and a summary of overall cpu and memory usage, as well as a quick view of how each program, program components, or system process is using the cpu and memory resources.users can also use task manager to switch between programs and to stop a program that is not responding.

cancel

closes the windows security dialog box

CLICK ME FOR READ MORE >>>

logging on locally to the computer

windows xp professional offers two options for login on locally.the welcome screen and the log on to windows dialog box.

the welcome screen

by default windows xp professional uses welcome screen to allow users to log on locally.to log on click the icon for the user account you want to use.if the account requires a password you are prompted to enter it.if the account is not password protected you are logged on to the computer.you can also use ctrl+alt+delete (press twice) at the welcome screen to get the log on to the windows dialog box.this enable you to log on to the administrator account which is not displayed on the welcome screen when other user accounts have been created.

a user can logon locally to either of the following

  • a computer that is a member of a workgroup
  • a computer that is a member of domain but is not a domain controler
KEYWORD "SYSTEM TIP, HOW TO MAINTAIN SYSTEM,SYSTEM SHORT CUTS,TIPS FROM BLOGSPOT,LATEST NEWS,OS INSTALL HINT,SNAPSHOT TUTORIAL,PROGRAMMING HINT,SOFTWARE INSTALL HINT,WEB DEVELOPMENT,WITHOUT INVESTMENT JOBS,ONLINE JOB IN COIMBATORE,
  •  

CLICK ME FOR READ MORE >>>

windows xp professional authentication process

to gain access to a computer running windows xp professional or to any resource on that computer, whether the computer is configured to use the welcome screen or the log on to windows dialog box, you must provide user name and possibly a password.

how windows xp professional authenticates a user depends on whether the user is logging on to domain or logging on locally to a computer.

access token

  • provides user identity and security settings
  • enable a user to gain access to resources and perform 
  •  
  • KEYWORD "SYSTEM TIP, HOW TO MAINTAIN SYSTEM,SYSTEM SHORT CUTS,TIPS FROM BLOGSPOT,LATEST NEWS,OS INSTALL HINT,SNAPSHOT TUTORIAL,PROGRAMMING HINT,SOFTWARE INSTALL HINT,WEB DEVELOPMENT,WITHOUT INVESTMENT JOBS,ONLINE JOB IN COIMBATORE,system tasks

CLICK ME FOR READ MORE >>>

preinstallation tasks

before you start the installation of windows xp professional, complete the following tasks.
  • ensure that your hardware meets the requirenments for installing windows xp professional.
  • determine whether your hardware is on the hardware compatibility list (HCL)
  • decide how you will partition the hard disk on which you will install windows xp professional.
  • choose a file system for the installation partition.
  • determine whether your computer will join a domain or a workgroup.
  • complete a preinstallation checklist
  •  KEYWORD "SYSTEM TIP, HOW TO MAINTAIN SYSTEM,SYSTEM SHORT CUTS,TIPS FROM BLOGSPOT,LATEST NEWS,OS INSTALL HINT,SNAPSHOT TUTORIAL,PROGRAMMING HINT,SOFTWARE INSTALL HINT,WEB DEVELOPMENT,WITHOUT INVESTMENT JOBS,ONLINE JOB IN COIMBATORE,

CLICK ME FOR READ MORE >>>

hardware requirements

you must determine whether your hardware meets or exceeds the minimum requirement for installing and operating windows xp professional.

windows xp professional hardware requirement.

  • processor - pentium 233 mhz or equivalent
  • memory - 64 MB minimum, 128 MB recommend, 4 GB maximum
  • hard disk space - At least 1.5 gigabytes (GB) of available space on the hard disk
  • display - Video adapter and monitor with Super VGA (800 x 600)or higher resolution
  • other drives - CD-ROM or DVD-ROM drive (not required for installing windows xp professional over a network)
  • accessories - keyboard and mouse or other pointing device.

CLICK ME FOR READ MORE >>>

what is hardware compatibility list (HCL)

although the windows xp professional setup wizard automatically checks your hardware and software for potential conflicts.before you install windows xp professional you should verify that your hardware is on the windows xp professional HCL.microsoft provide tested drivers for the listed devices only.using hardware not listed on HCL could cause problems during and after installation.the most version of HCL for released operating systems are on the microsoft website at http://www.microsoft.com/whdc/hcl/default.mspx

note - if your hardware is not in the HCL the hardware manufacturer might be able to provide you with a windows xp professional driver for the component.

CLICK ME FOR READ MORE >>>

disk partitions

the windows xp professional setup program examine the hard disk to determine its existing configuration.setup then allows you to install windows xp professional on an existing partition or to create a new partition on which to install it.

new partition or existing partition

depending on the hard disk configuration, do one of the following during installation.

  • if the hard disk unpartitioned, create and size windows xp professional partition.
  • if the hard disk partitioned and contains enough unpartitioned disk space use the unpartitioned space to create windows xp professional partition.
  • if the existing partition is large enough, install windows xp professional on that partition.installing on an existing partition overwrites any existing data.
  • if the existing partition is not large enough, delete it to provide more unpartitioned disk space for creating the windows xp professional partition.
remaining free hard disk space

although you can use setup to create other partitions, you should create and size only the partition on which you will install windows xp professional.after you install windows xp professional, use the disk management tool to partition any remaining unpartitioned space on the hard disk.

installation partition size

microsoft recommends installing windows xp professional on a 1.5 or larger partition.although windows xp professional requires less disk space for installation, using a larger installation partition provides the flexibility to install windows xp professional updates, operating system tools, programms, user documents or other necessary files in the future.

CLICK ME FOR READ MORE >>>

file systems using in windows xp

after you create the installation partition, setup prompts you to select the file system with which to format the partition.like microsoft windows NT 4 and microsoft windows 2000 professional, windows xp professional supports the NT file system (NTFS or new technology file system) and file allocation table (FAT). both windows 2000 professional and windows xp professional supports FAT 32.

use NTFS when the partition on which windows xp professional will reside requires any of the following features.

  • file and folder level security. NTFS allows you to control access to files and folders.
  • disk compression. NTFS compresses file sto store more data on the partition.
  • disk quota. NTFS allows you to control disk usage on a per-user basis.
  • encryption. NTFS allows you to encrypt file data on the physical hard disk, using the microsoft encrypting file system (EFS)
the version of NTFS in windows xp professional supports remote storage, dynamic volumes, and mounting volumes to folders. windows xp professional, windows 2000, windows 2003, and windows NT are the only operating systems that can access data on a local hard disk formatted with NTFS.

FAT and FAT 32

FAT and FAt 32 offer compatibility with other operating systems. you must format the system partition with either FAT or FAT 32 if you will dual boot windows xp professional and another operating system that requires FAT or FAt 32.

FAT and FAT 32 do not offer many of the features (for example, file level security) that NTFS supports.therefore in most situations you should format the hard disk with NTFS. the only reason to use FAT or FAT 32 is for dual booting with another operating system that does not supports NTFS. if you are setting up a computer for dual booting you need to format only the system partitions as FAt or FAT 32. for example if drive C: is the system partition you could format drive C: as FAt or FAT 32 and format drive D: as NTFS.

CLICK ME FOR READ MORE >>>

overall view of installing windows xp professional from cd-rom

the installation process for windows xp professional combines the setup program with wizards and informational screens. installing windows xp professional from a cd-rom to a clean hard disk consists of these four stages.
running the setup program


setup prepares the hard disk for the later installation stages and copies the files necessary to run setup wizard.

running the setup wizard

the setup wizard requests setup information about the computer, such as names and passwords.

installing windows xp professional networking components

after gathering informations about the computer the setup wizard prompts you for networking informations and then installs the networking components that allow the computer to communicate with other computers on the network.

completing the installation

setup copies files to the hard disk and configures the computer,the system restarts after installation complete

CLICK ME FOR READ MORE >>>

understanding the TCP/IP protocol suite

tcp/ip provides communication across networks of computers with various hardware architectures and operating systems.microsoft's implementation of tcp/ip enables enterprise networking and connectivity on computers running windows xp professional

CLICK ME FOR READ MORE >>>

what is TCP/IP protocol suite

tcp/ip is an industry - standard suite of protocols that enables enterprise networking and connectivity on windows xp professional based computers.adding tcp/ip to a windows xp professional configuration offers the following advantages.
  • a routable networking protocol supported by most operating systems.most large networks rely on tcp/ip
  • a technology for connecting dissinilar systems.you can use many standard connectivity tools to access and transfer data across dissimilar systems.windows xp professional includes several of these standard tools.
  • a robust, scalable, cross-platform client/server framework. tcp/ip supports the microsoft windows sockets (winsock) interface, which is ideal for developing client/server applications for winsock-compliant stacks.
  • a method of gaining access to internet resources.
the tcp/ip suite of protocols provides a set of standards for how computers communicate and how networks are interconnected. the tcp/ip suite of protocols maps to a four-layer conceptual model network interface, internet, transport and application.

CLICK ME FOR READ MORE >>>

Recent

Followers

AddUrlYahoo
Powered by Blogger.